Tutorial for "Flag Card"
Well, I am not quite sure what this card is called but it has these little flags inside so that is what I am calling it. LOL.

Sat down and made a tutorial for anyone who may be interested.. please excuse the old wrinkled hands..my usual hand model wasn't available...hahaha.
PLEASE CLICK ON PICTURE TO ENLARGE THEM.
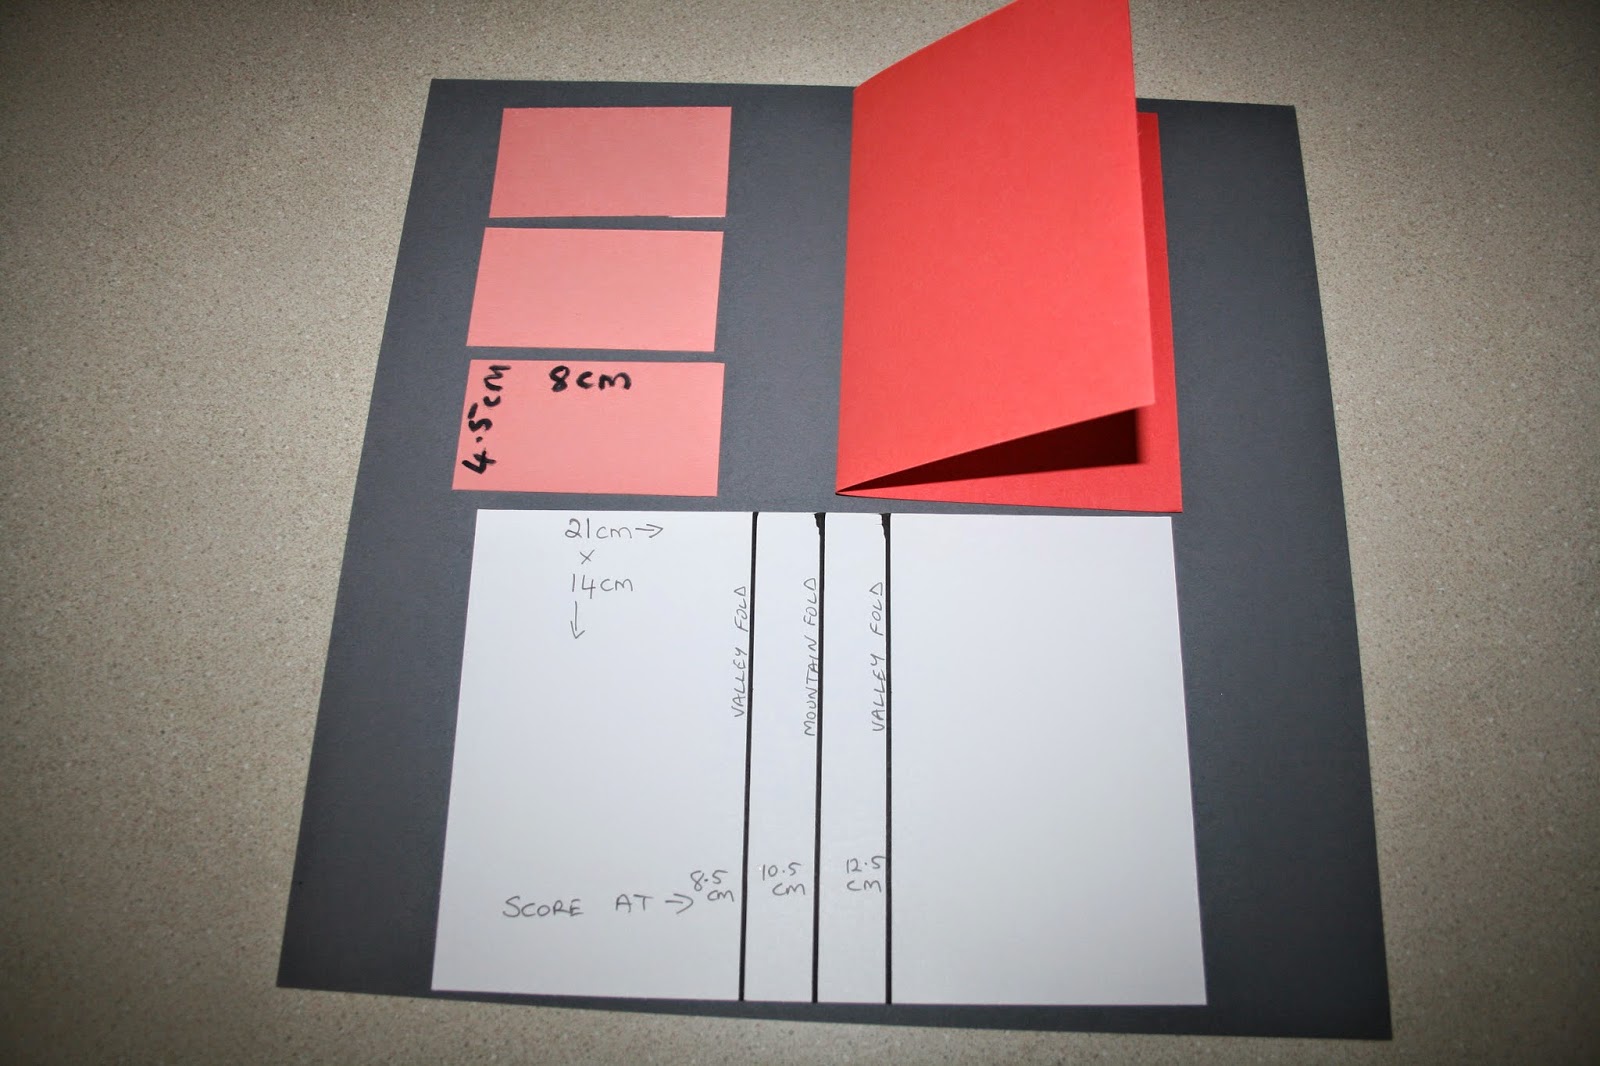
15cm x 21cm folded card base in your choice of colour.
Piece of card for inside - I like white or vanilla but you can use any colour.
14cm x 21cm
Score this piece at 8.5cm...10.5cm...12.5cm
3 pieces of card stock for your Flags - 8cm x 4.5cm

With your inside piece you have scored you need to fold it.
Valley Fold, Mountain Fold, Valley Fold.
Before you stick this down to your card base you can add stamps onto the edges of the card if you want. Or a greeting stamp inside if you aren't going to put any on your flags.
I am going to leave my blank this time.

Now place some adhesive on the back side of the this card. But only up to the FIRST SCORE LINE.
My finger is on the piece below. You don't want any adhesive between your middle three score lines.
Stick this to the inside of your base card leaving a border as shown.

Now you can put adhesive on the back of the other side. I like to fold it over like so.
Put my glue on and then close the card together to adhere.


Open the card and it should look like this. Voila!
(Except without the words Glue written on it. lol.)


Now you can add your decorated Flags.
Place the middle one on the left hand edge as shown.


All done.

I did replace the flags with a different colour but here it is. A birthday card for a special friend.
 |
| (click on photo to enlarge) |
I used Soft Sky as a matt on the card base.
Gold frame and butterflies are from the Gold Foil Sheets in the All Occasions Catalogue.
The Gold Frame was made with the Square Framelits.
The circular bush in the frame is from Betsy's Blossoms stamped in Pear Pizzaz.
Leaves from the Secret Garden Framelits are in Pear Pizzazz and Wild Wasabi.
Butterflies are from Beautiful Wings Embosslits in Crisp Cantaloupe, Coastal Cabana and Gold Foil.
Best Wishes from Perfect Pairs Stamp Set in Calypso Coral.

You can't see it here but the butterfly is layered with Crisp Cantaloupe and Coastal Cabana butterflies.

Inside I replaced the little crisp Cantaloupe flags with Soft Sky ones and added some different greetings, butterflies and bushes to each one.

So there it is. You should give it a try. You can even add this into a card you have already made. I am in the process of doing that now and will show you in my next post.
Yes, I can't stop making them now! haha!
Next time I will show you my Mother's Day card and a Male Card with these little flags.
See you then. Vx


What a fabulous idea for a surprise on opening the card! Thank you so much for sharing all the details too :-) And love the card you made with all the different butterflies too - such wonderful texture!
ReplyDeleteThankyou for making this great tutorial. I needed it this week.
ReplyDeleteLove your blog.
SuZ
looks hard to make and iam in the states so I dont understand the CM yet we are still useing the inches here buit if i knew what the numbers was I think I could make this cardthank you so much.
ReplyDeleteMaryR