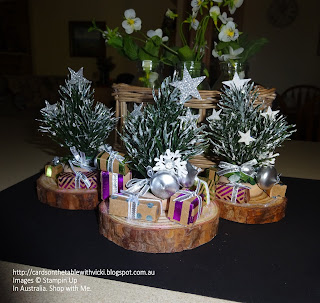
Christmas tree ornaments
Featuring: 3D, Christmas ornaments, Green sprigs, mini ornaments, Foil Frenzy Cardstock, mini wreaths
This is a special blog post today.
I have made some cute little Christmas Tree ornaments using the Green sprigs and mini ornaments from the Holiday Catalogue p.12 and just had to share all the details for anyone interested in making some themselves.
Not everything is Stampin'Up.
So this is how I made them.
I then placed another green sprig in the centre of the three and glued it in place with hot glue gun.
Now I have a mini tree.
To make a snowy appearance on my tree I used these two products below which I had in my cupboard. I do think the Stampin'Up Embossing Paste with Dazzling Diamonds glitter would also give a similar effect.
I just applied these products all over the branches until I was happy and then set it aside to dry.
Didn't take too long.
 |
| (click on photo to enlarge) |
I added a snowflake and glimmer gem (snowflake from Swirly Snowflakes dies p.35). attached to top of ornaments with hot glue gun.
Around the base of the tree I also wrapped a mini wreath (p.197 main catalogue) and some silver ribbon.
I have used silver ribbon, white bakers twine and mini silver sequins for the presents from our main catalogue p.198/199)
I attached my tree to a wooden round like the one below (left) that I found in a craft store in Australia called Riot.
But I also think you could use a paper mache box (right) decorated for a stand too.
What tree doesn't need some presents?!
So I pulled out my Foil Frenzy Specialty designer paper (which is more like a light weight cardstock) and made up some little boxes.
(don't forget you can click on any of these photos to enlarge them)
and here are the Rectangle measurements (2 sizes)
I used my tombow glue and mini glue dots for these and hot glued them onto the wood round. I even glued one on top of the other for interest.
I added some silver glimmer punched stars in the tree with the hot glue gun. And that is it! All done!
I hope you were able to follow the instructions and this was helpful for you.
Have fun creating your own mini Christmas tree versions. I look forward to seeing them.
But Now for some birdy news...
I heard an unusual bird call in the back garden yesterday and went out to investigate.
I found this little guy perched on our pool umbrella.
Very friendly. Only a couple of feet from me and not scared at all or camera shy for that matter. LOL.
I have never seen this bird around here. It looks a lot like our resident Cockatoo but without the yellow crest.
So after some research I discovered we had a Little Corella in our backyard!
Now I don't think these are common to our area and perhaps it was an escapee from someone's home.
Though they are widespread throughout Australia.
It certainly wasn't shy of humans.
But what an entertaining visitor it was.
And so photogenic!
Thanks for stopping by. See you next week with some more Christmas fun.
Vx


Comments
Post a Comment